Monday, December 3, 2012

Nativity Silhouette Experiment


Experiment time!

Back in high school, I used to do dot art. Think Seurat's pointillism, but with ink pens. One of my really good friends and I just went back through my high school art collection and my old pieces inspired me to try another version of the art and transfer the dots into calligraphy (of sorts). I also saw something similar at the Craftsman's Classic craft show Thanksgiving weekend and couldn't wait to try.

First I took some versions of nativity silhouettes from the internet (thanks Google search!) and modeled my own quick sketch after them. Then I penciled in the Christmas story from the book of Luke. I'll admit I was totally inspired by Linus's recitation from A Charlie Brown Christmas. I retraced my pencil words with pen, erased the pencil marks, and was left with my finished product:


Here's a closer view...


I followed the manger around, did a few words around the star, and then did the story from Joseph to Jesus to Mary, ending with the words proclaimed by the angel as the ground.


And for all fellow translation nerds, the words came from my New Revised Standard Version: Catholic Edition bible. 

I won't say it's my favorite piece I've ever completed, by the message behind definitely ranks number one in my book.

Any nativity crafts to share? Let me know in the comments!

Wednesday, November 28, 2012

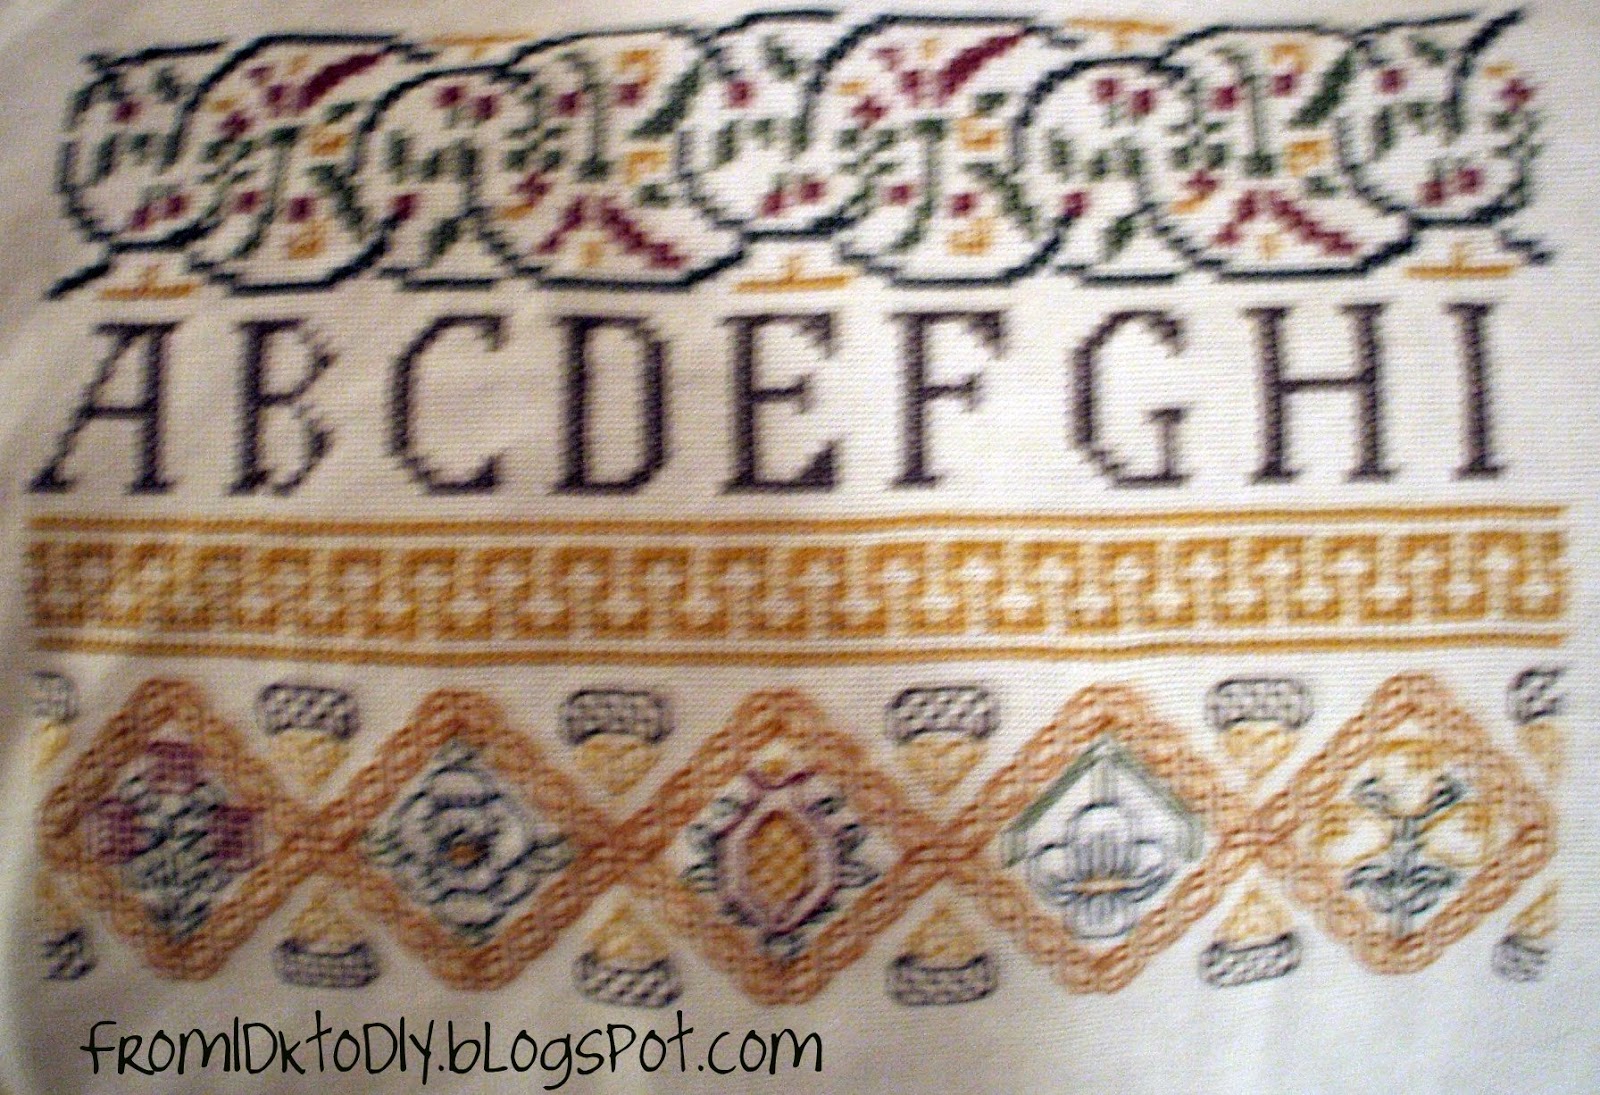
Celtic Band Sampler


One would assume that a sampler project would probably be the first a budding needle artist would attempt. That would make sense. However, I never seem to do anything the way I'm suppose to in the crafty world, so I've started my first sampler now.

The beautiful pattern was made by Homespun Sampler and I love it. I did take some artistic license with the colors and changed the various olive tones to more golden hues left over from my Hogwarts Crest. It was a choice that helped me save money (granted, about $0.65)...and I'm just not really big on olive. The colors seemed to mesh well with the other original choices, so I'm happy with my decision so far.


This part would have been a lot easier had I not jumped in and overlooked the instructions to stitch "2x2." For those of you who (like me) prefer to ignore any directions you don't understand, stitching 2x2 means to use two threads of floss (which I did) over two threads of fabric (which I did not do). Which meant my first attempt was half the size it should have been...Oops. Thank you, internet, for helping me figure out my mistake.


Also, an interesting face about old, or old-styled, samplers. They often do not include "J" or "U" because those letters weren't really used in English yet. I didn't realize this when I bought the pattern and the OCD part of me really wanted all the letters to be included. After a little finagling, I was able to scoot the "I" onto the first line, turn the original "I" into my "J," and shoved a "U" into the third line of letters. Yay!

 
This has been my first venture into any stitches other than the basic cross stitch. I'm in love with the more detailed areas. I will admit I completely failed on the French knots that are supposed to be in the "strawberries" in diamond one above. I just turned them into cross stitches instead.


Much clearer pictures. I apologize for the blurriness of my camera/relative inexperience.

 
More detail work. I'm loving the darker burgandy color in this section.


And here is where I currently sit. I need to keep working on it, but I've gotten distracted with more Christmas crafting.

What are your long-term projects? Starting anything new this holiday season?

Tuesday, November 20, 2012

The First Noel (I Made Myself)


I. Love. Christmas!

I know we aren't quite to Thanksgiving yet...but I couldn't wait to get started on more Christmas decorations for my apartment this year.

Yarn crafts + Christmas = magic...so obviously I had to do yarn covered letters. I picked out some sparkly red, green, and white yarn and tag board letters spelling "NOEL."


For the "N" (the hardest letter for me), I tried using small pieces of yarn on the tops and bottoms of the letter to cover the edges. It was a lot more work than the second method I discovered after a little extra hunting online. On the "E" and "L" I wrapped each entire letter up vertically and then went back over each letter horizontally again. (The "O" was as simple as going around and around and around through the middle.)


I used Tacky Glue to secure the end, but I would suggest hot glue or something else that might adhere to yarn more quickly. After holding the ends in place for 10-15 minutes, my glue worked out all right though.

I don't have a tree skirt (and I'll admit my tag board isn't wide enough to stand up by itself the way more boxy cardboard letters would), so I laid them out around my little 3' tree as a psudo-skirt.


And in all it's beautiful majesty...


Who else is excited for Christmas already?

Friday, November 16, 2012

Websites I Love


(Note: I was trying to make this a new page for the blog, but it wasn't showing up on my current layout. I guess it's another one of those things IDK how to do and I'll need some time before I can DIM(yself). Still wanted to share though!)

I get my inspiration from all over the internet, but there are certain sites I can't help but revisit...nearly on a daily basis. Here's just a small sample of my must-sees:

Crafts Galore

Pinterest. Obviously. Everybody I know has become obsessed with this site, and for good reason. You can find anything and everything on Pinterest. I have gotten a lot of my ideas, recipes, and tutorials from the links they provide.


Craftgawker. Very cool website with a Pinterest-y flair, but stays completely and totally focused on crafting. You don't have to wade through the weight loss plans and random cat pictures (not that I don't love a good lolcat) to get to the real projects of interest. I don't like the web interface as much as with some other sites; however it does give a great number of ideas per page, so you don't have to spend so much time scrolling through pages.

Home Organization/Decor

IHeart Organizing. So...I'm kind of obsessed with organization. Whether or not I accomplish it, I always have these grand ideas for how to make my home and work spaces run more efficiently (and look great while they do it). I Heart Organizing always shows me envy-worthy spaces that make me look forward to my own dream home. 

School Counseling

Elementary School Counseling - Marissa's Blog. As much as I love crafting, I am an elementary school counselor at heart. And Marissa Rex is the counselor I want to be when I grow up. She is also single-handed the reason I want my own personalized muppet for classroom guidance.

I (Heart) School Counseling. Run by a personal friend of mine, this blog is just simply awesome. She touches on all aspects of counseling at her school (and makes some pretty cool stuff at Vistaprint). 

Just for Fun

GeekCrafts. I'm just a geek. I love anything fantasy, sci-fi, or a little crazy. Therefore, I *love* this website. I mean, who doesn't want to knit or crochet their own arm of adorable Daleks?

A Riot Patch of Pixels. I am simply in awe of her cross stitching skills. It makes me want to go play Zelda or Pokemon while stitching. Not sure that's possible, but I want to do it anyway.

Thursday, November 15, 2012

Personalized Stockings


Our poor Christmas stockings. For years, I've been promising my mother I would find some way to attach our family's names to our stockings. Something better than the paper tags I made about six years ago...


I promise the looked better at the time of the original installation.

So the last couple of years, I've been toying with the idea of embroidering our names onto the stockings. But how to do that on the extremely fuzzy tops of the stockings without having fuzz poking through all of my stitches?

My first thought was to stitch our names onto some ribbon and wrap the ribbon around the top of the stockings. The bad blogger in me didn't take pictures of the disaster before I threw it away. You can use your imagination. Just imagine lots of embroidery floss holding together the tattered threads of some white ribbon.

It really did feel about that bad.

So I took some left over cloth I had from another project and began stitching on tried and true Aida.


Font from: http://www.freepatternsonline.com/xscharts/page/abc13.htm

Much better. And I really liked the font and colors I picked out. Perfect.

But they turned out so small. They definitely wouldn't as replacements for my paper tags. So then I thought maybe I could turn them into tags attached to the loops they hang from.


I added some evenly spaced stitches to pull back the uneven edges...but I think I left too little room between names to make the best borders. I label this one as a work in progress...but it's still a giant step in the right direction away from torn construction paper and shredded ribbons. Updates soon!

Any Christmas improvements you've been meaning to do?


Tuesday, November 13, 2012

So I'm a Bit of a Flower Child


So I could NOT get this beautiful piece of wall art out of my head after seeing it on Pinterest...


...and I just knew I had to figure out how to make it. From the picture, it was pretty clear I need canvas and scrapbook paper. But what else to do? What was the best way to accomplish my task?
It's Doable gave me the answer with their beautiful tutorial. After a quick trip to the store, where I picked up a 9"x12" canvas, black acrylic paint, sponge brushes, scrapbook paper, and Mod Podge, I was ready to begin.
First, I painted my entire canvas black, including the sides. It took two coats, but each took only about 15-20 minutes to dry.


I spent the wait time between coats cutting out petals. Though my inspiration picture and tutorial used varied colors, I decided on a more monochromatic set of turquoise scrapbooking paper. Each petal is about 1.5" long and varies in width. I cut out a circle from a black patterned paper and began to set out the petals on the canvas around the center spot.


I love the color and the patterns!


Then I went through and painted the back of each and every piece with Mod Podge to glue it down. If the petal hung over the edge just a little, I glued it over. Any longer than the side edge, and the petal got a trim. Once all of the petals were safely secured, I sealed the entire piece with the same matte finish Mod Podge I'd used as glue.

Here's the finished product:


I'm SO happy with how it turned out. I actually bought three canvases, so I'm thinking about doing two more flowers in two different colors to make a set...maybe pink and purple?

What inspiration have you found online? Any DIY projects you're looking forward to?

Monday, November 12, 2012

It's Beginning To Look A Lot Like Christmas!


Christmas is my absolute favorite time of year! And I learned the hard way last year that if I want to be able to give my friends and family homemade gifts...I need to start much earlier than Thanksgiving. I improved my record from last year by about a month and started with a little embroidered Christmas ornament.

I started with a beautiful pattern from www.needlethread.com:
Then I imported it into Microsoft Word and overlaid a grid, making it a little more user-friendly.


Next came the question of how I was going to bring this perfectly Christmas-y pattern into real life. I attempted cross stitching, but the didn't come out as cleanly as I had hoped. So then I started over and outlined the shapes in back stitch, filling in later with a satin stitch. 


I still have some lines to clean up, but overall I'm very pleased with the finished look. Are you planning any holiday projects this year? Share in the comments!

Thursday, November 8, 2012

Hogwarts, A History


Hogwarts truly presents a brief history of me. Harry Potter was my obsession growing up. I began reading the first book when I was 11...the same age Harry was when he found out he was a wizard. I read the books repeated, watched the movies constantly, and still have long conversations with one of my best friends about the various inner workings hidden in Hogwarts.

It only seemed appropriate that my first major cross stitching venture should be into the world of Harry Potter. I took on the Hogwarts Crest.


Thinking back, I probably should have started with a bookmark or something. I had practiced a little on an old stamped kit from my aunt, but decided counted cross stitching was the place to be after my kitten wasn't turning out so hot.

I began in the center with the "H" and realized this was probably going to be a lot bigger than I ever imagined.

But I kept going...


And going...


Until I realized that the top of the pattern from little mojo was not going to fit on my Aida cloth. By about...10 rows. Not much in the grand scheme of things. But I'd come too far to stop now.


I actually like it better this way. It took about a year.
But I feel like it was worth it.


So what projects have you been working on? Have there been any "mistakes" that turned out for the best?

Welcome!


Hi there! It's nice to meet you. I'm so excited about starting "From IDK to DIY" because it is pretty much the story of my life. There are so many things I want to be able to do, and more often than not my first thought is, "IDK how to do this..." and later, "What am I getting myself into?!" 

But eventually, through the help of friends, family, Google, and lots of trial-and-error, I get there. I don't claim to be a master chef, an expert seamstress, or a professional home decorator, but usually I can find some way to DIM(yself). 

I'm excited to share some new adventures, project successes (and failures), and memories with all of you.

Let's get started!